Renton, Washington, boasts a rich history, and much of its charming suburban character was defined during the residential housing boom of the 1970s and 1980s. Neighborhoods throughout the area are filled with homes from this era that feature solid construction, beautiful lots, and mature trees. However, these homes often come with one significant drawback for the modern homeowner: closed-off, cramped, and poorly lit kitchen layouts. Decades ago, kitchens were designed strictly as utilitarian workspaces hidden away from the rest of the home. Today, the kitchen is the undisputed heart of the house, demanding a blend of aesthetic appeal, open flow, and highly functional storage.
If you own an older home in Renton, you are likely familiar with the frustrations of navigating a galley kitchen or a tight U-shaped layout characterized by dropped ceilings, bulky wood soffits, and insufficient counter space. Modernizing these spaces requires more than just a fresh coat of paint or new appliances; it demands a strategic approach to spatial optimization. A successful small kitchen remodel in these mid-century or late-century homes hinges on tricking the eye into perceiving more space while squeezing every ounce of functionality out of the existing square footage.
From rethinking your cabinetry footprint to completely overhauling the outdated lighting schemes, there are specific, highly effective strategies tailored for 1970s and 1980s architecture. This comprehensive guide will walk you through the most impactful small kitchen remodel ideas, helping you maximize your space, enhance your home’s value, and create a bright, welcoming culinary environment that meets the demands of contemporary living without requiring a massive structural addition.

The Challenge of 1970s and 1980s Kitchen Layouts in Renton
Understanding the architectural context of Renton’s residential development is crucial before swinging a sledgehammer. During the 1970s and 1980s, local homebuilders prioritized distinct separation of rooms. The open-concept living space that dominates modern interior design was practically unheard of. As a result, kitchens were often boxed in by load-bearing walls, featuring heavy, dark oak cabinetry, laminate countertops with thick edges, and dreaded dropped ceilings or soffits designed to hide ductwork and wiring.
One of the primary challenges in remodeling these spaces is dealing with the physical boundaries. Expanding the kitchen’s footprint by removing walls often involves complex structural engineering and expensive rerouting of plumbing and electrical lines. Therefore, most homeowners must learn to work strictly within the existing envelope. This means that every single inch of the room must be justified. The original layouts frequently disrupted the classic “work triangle”—the optimal path between the sink, stove, and refrigerator—by placing cumbersome peninsulas or poorly positioned doorways in the way of smooth culinary execution.
Furthermore, these older Renton homes often suffer from a severe lack of natural light. Small windows positioned awkwardly over the sink do little to illuminate the deep, dark corners created by bulky upper cabinets. Recognizing these inherent limitations is the first step in successful renovation planning. By identifying what cannot be easily changed, you can focus your budget and creative energy on high-impact modifications, such as aggressive storage optimization and comprehensive lighting upgrades, to breathe new life into a stubbornly small footprint.
Smart Cabinet Solutions for Cramped Kitchens
When dealing with limited square footage, your choice of cabinetry will make or break the entire remodel. Standard, off-the-shelf cabinets often leave frustrating gaps and dead spaces that could otherwise be utilized for valuable storage. In an older Renton home where space is at an absolute premium, transitioning to smarter, highly optimized cabinet solutions is non-negotiable. Traditional face-frame cabinets, which were incredibly popular in the 70s and 80s, feature a wooden frame around the front of the cabinet box. While sturdy, this design eats into the usable interior space and narrows the opening for drawers and pull-outs.
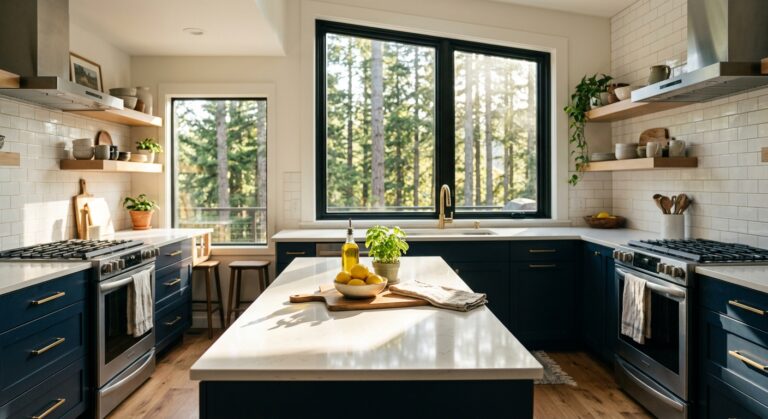
Transitioning to frameless, European-style cabinetry is a game-changer for small spaces. Because there is no face frame, you gain immediate, unhindered access to the full width of the cabinet box, maximizing drawer capacity and shelving width. Additionally, frameless cabinets offer a sleeker, cleaner visual line. The tight gaps between doors and drawers reduce visual clutter, which helps a tiny kitchen appear visually larger and less chaotic. Opting for flat-panel or shaker-style doors in light colors further enhances the illusion of a spacious, modern layout.
Beyond the style of the cabinets, customizing the depth and width of your base and wall units can help accommodate the awkward angles sometimes found in older architectural layouts. Using reduced-depth cabinets on one side of a narrow galley kitchen can widen the walkway, allowing for better traffic flow without entirely sacrificing a drop zone or storage area. Every cabinet decision in a small kitchen remodel must be heavily scrutinized to ensure it serves a specific, space-maximizing purpose.
Utilizing Vertical Space with Ceiling-High Cabinetry
A hallmark of 1970s and 1980s kitchen design was the ubiquitous kitchen soffit—a bulky, boxy structure built between the top of the upper cabinets and the ceiling. While occasionally housing essential plumbing or HVAC ducts, these soffits were frequently empty, built simply because it was the prevailing style of the era. Removing these soffits and extending your upper cabinetry entirely up to the ceiling is one of the most effective ways to increase storage space and elevate the aesthetic of your kitchen.
By drawing the eye upward, ceiling-high cabinets instantly make the room feel taller and more expansive. The new top-tier shelves, while perhaps too high for daily access, provide the perfect, dust-free sanctuary for seasonal items like holiday platters, large roasting pans, and specialized baking equipment that previously cluttered your primary countertops. If removing the soffit is impossible due to hidden utilities, an alternative is to reface the soffit to blend seamlessly with the cabinets below, creating the illusion of continuous height.
Furthermore, topping these extended cabinets with simple, elegant crown molding bridges the gap between the modern cabinetry and the ceiling, giving the kitchen a polished, custom-built finish. Maximizing vertical real estate ensures that not a single cubic inch of your kitchen is wasted, fundamentally solving the chronic storage shortages typical of older Renton homes.
Pull-Out Organizers and Hidden Storage Features
In a compact kitchen, deep base cabinets can quickly become disorganized black holes where Tupperware lids and forgotten canned goods go to disappear. Upgrading to advanced, internal storage hardware is vital for maximizing space and maintaining sanity. Instead of static shelves behind base doors, incorporating deep, heavy-duty pull-out drawers allows you to bring the contents of the cabinet out to you. This provides a clear, top-down view of everything you own, eliminating the need to crouch and dig through dark corners.
Corner spaces in U-shaped or L-shaped layouts are notoriously tricky. Traditional lazy Susans are helpful, but modern blind corner pull-out systems—often referred to as magic corners—are far superior. These articulated shelving units glide out of the deep corner space and swing entirely into the walkway, granting complete access to areas that were previously dead zones. Similarly, utilizing narrow, six-inch gaps between appliances and cabinets for slim, pull-out spice racks or baking sheet dividers ensures that even slivers of space become highly functional.
Don’t forget the area under the sink, which is often a messy tangle of plumbing and cleaning supplies. Custom-fitted pull-out caddies that slide around the p-trap can neatly organize soaps, sponges, and dishwasher pods. Integrating a hidden pull-out trash and recycling center is perhaps the most crucial upgrade, as it removes an unsightly freestanding garbage can from the floor plan, immediately freeing up precious walking space.
Opting for Open Shelving to Create an Airy Feel
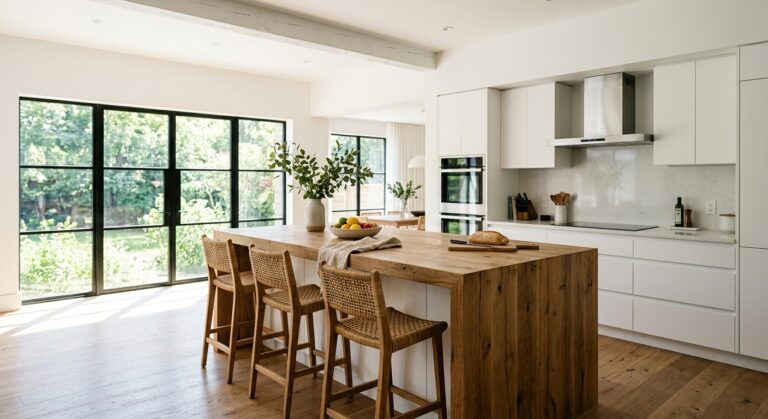
While maximizing closed storage is critical, installing wall-to-wall upper cabinets in a small room can inadvertently make the space feel heavy, claustrophobic, and top-heavy. To counteract this, strategic integration of open shelving can introduce a much-needed sense of visual relief and airiness. Replacing just one or two sections of upper cabinetry—particularly around the sink or near a window—with floating shelves can drastically open up the sightlines of a tight 1980s layout.
Open shelving forces a degree of curation, serving as a beautiful display area for your most-used and aesthetically pleasing items, such as crisp white dinner plates, clear glassware, or decorative ceramic mugs. This design choice adds personality and warmth to the kitchen, contrasting nicely with the sleekness of modern lower cabinets. Thick wooden shelves, like reclaimed oak or walnut, can introduce a natural, organic texture that grounds the space, while metal brackets can add a subtle industrial edge.
However, it is vital to strike a balance. Too much open shelving can quickly cross the line from curated to cluttered, exacerbating the feeling of a cramped room. The key is to reserve open shelves for neatly stacked, cohesive items, while hiding mismatched plastics and garishly packaged pantry goods behind closed doors. When balanced correctly, this hybrid approach to wall storage ensures the kitchen remains highly functional while feeling significantly more spacious.

Brightening Your Space: Lighting Upgrades for Older Homes
One of the most persistent issues in homes built in Renton during the 1970s and 80s is abysmal kitchen lighting. The standard builder-grade solution of the era was often a single, glaring fluorescent light box mounted directly in the center of the ceiling. Not only does this type of lighting cast harsh, unflattering shadows over the workspace, but it also leaves the perimeters and corners of the kitchen shrouded in darkness. In the world of interior design, shadows are the enemy of small spaces; they make walls feel as though they are closing in.
To effectively maximize a small kitchen, a comprehensive overhaul of the lighting plan is absolutely essential. Modern lighting design relies on multiple, overlapping layers to create a space that is both highly functional for cooking and warmly inviting for gathering. By strategically placing light exactly where it is needed, you can trick the eye into perceiving a much larger, deeper room. Replacing that central fluorescent box with an array of sleek, flush-mount recessed LED can lights is usually the first structural step in this transformation.
Moreover, the color temperature of the bulbs plays a massive role in how the space feels. Older bulbs often cast a yellow or green hue that makes vintage materials look dingy. Transitioning to LED lights with a color temperature between 3000K and 4000K provides a clean, neutral white light that accurately renders food colors, makes white cabinetry pop, and mimics the natural daylight that these older homes so desperately lack.
Layered Lighting: Combining Task, Ambient, and Accent Fixtures
A truly optimized kitchen lighting scheme consists of three distinct layers: ambient, task, and accent lighting. Ambient lighting serves as the foundational base layer, providing general illumination for the entire room. In a low-ceilinged 1980s home, appropriately spaced recessed ceiling lights offer excellent ambient coverage without cluttering the overhead visual space with bulky fixtures. This ensures that every corner of the kitchen receives a baseline level of brightness.
Task lighting is intensely focused illumination directed specifically at work zones, such as the countertops, the sink, and the stovetop. This is where most older kitchens fail miserably, forcing the cook to work in their own shadow. Pendants hung directly over a peninsula or a small island serve as excellent task lights while also acting as decorative focal points. Ensuring your primary prep zones are flooded with clear, direct light is the most critical functional upgrade you can make.
Finally, accent lighting adds depth and dimension to the room. This could take the form of small, directional spotlights highlighting a piece of art, or subtle illumination inside glass-front cabinetry to show off fine china. By utilizing all three layers, the kitchen gains a dynamic, three-dimensional quality. The walls appear to push backward, and the entire atmosphere shifts from a dreary utility room to a sophisticated, welcoming culinary environment.
Under-Cabinet Lighting to Expand Visual Space
If you have a limited budget and can only afford one significant lighting upgrade during your small kitchen remodel, under-cabinet lighting should be the top priority. Because upper cabinets inherently block overhead ambient light, the countertops directly beneath them—which are your primary preparation areas—are almost always cast in deep shadow. This shadow line effectively cuts the room in half visually, making the walls feel much closer than they actually are.
Installing continuous LED tape lighting or slim LED light bars along the underside of the upper cabinets completely eradicates these shadows. By washing the backsplash and countertops in bright, even light, under-cabinet fixtures create an illusion of depth, significantly expanding the visual space of the room. Furthermore, it highlights the textures and colors of your countertop and backsplash materials, adding a high-end, custom look to the design.
For ultimate flexibility, ensure these under-cabinet lights are wired to a dimmer switch. During the day, they can be turned up to assist with precise chopping and cooking tasks. In the evening, dimming them provides a beautiful, soft nightlight effect that gives the kitchen a warm, ambient glow without the need for harsh overhead lighting. It is a relatively inexpensive upgrade that yields a disproportionately massive impact on how large and luxurious your kitchen feels.

Additional Space-Saving Design Tricks for Small Renton Kitchens
Beyond major cabinetry and lighting overhauls, the design details and material finishes you choose can significantly influence how spacious your kitchen feels. One of the most common mistakes homeowners make in small spaces is purchasing full-sized, standard-depth appliances. A massive refrigerator that protrudes six inches past the cabinet line creates a frustrating bottleneck and disrupts the clean, linear flow of the room. Investing in counter-depth appliances is a critical strategy; they sit flush with the base cabinets, creating a seamless, streamlined look that visually and physically widens the walkways.
Similarly, rethinking your sink choice can yield surprisingly positive results. While massive double-basin sinks were a staple of past decades, a deep, single-basin workstation sink offers far more utility in a small footprint. Workstation sinks feature integrated ledges that support cutting boards, colanders, and drying racks, effectively allowing you to do your prep work right over the sink and freeing up precious adjacent counter space.
Finally, utilize the power of reflection and color. Dark, heavy colors absorb light, causing a room to shrink visually. Sticking to a predominantly light color palette—think soft whites, warm creams, or pale grays—will reflect natural light and bounce it around the room. You can amplify this effect by choosing high-gloss finishes for your backsplash tiles, such as classic glazed subway tiles or zellige tiles. The subtle mirror-like reflection of a glossy backsplash adds an illusion of depth, making the walls feel as though they are receding outward, further contributing to a bright, airy aesthetic.
Planning Your Remodel: How to Modernize Your 70s or 80s Layout
Embarking on a kitchen remodel in an older Renton home requires meticulous planning and a clear understanding of the local landscape. Before purchasing materials, it is vital to establish a realistic budget that accounts for the hidden surprises frequently found in older houses. When you open up walls built in the 1970s, it is not uncommon to discover outdated electrical wiring, galvanized plumbing that needs replacing, or structural anomalies. Building a contingency fund of at least 15 to 20 percent into your total budget is a necessary safeguard to handle these unforeseen issues without compromising your design goals.
Choosing the right professionals is equally important. While DIY projects can save money, navigating the permitting process in the City of Renton and handling complex plumbing or electrical shifts requires seasoned expertise. Seek out local design-build firms or contractors who have verifiable experience specifically working on mid-century or late-20th-century residential remodels. They will be familiar with the common structural quirks of homes in neighborhoods like the Renton Highlands or Fairwood, and they can offer realistic advice on what load-bearing walls can be modified.
During the planning phase, leverage 3D modeling software with your designer. Seeing a realistic digital render of your proposed layout can help you identify tight pinch points and awkward cabinet swings before they become expensive physical realities. Take the time to map out exactly where your pots, pans, and daily appliances will live in the new design. A remodel is the perfect opportunity to purge unnecessary clutter and create a highly intentional, tailored environment that perfectly supports your unique cooking and lifestyle habits.
Conclusion: Transforming Your Older Renton Kitchen
Transforming a cramped, dimly lit kitchen from the 1970s or 1980s into a bright, modern, and highly functional space is one of the most rewarding home improvement projects you can undertake. While the physical footprint of an older Renton home might seem limiting at first glance, it merely presents an exciting opportunity for creative problem-solving. By employing strategic design principles, you can overcome the architectural constraints of the past.
Through the implementation of smart, ceiling-high frameless cabinetry, the integration of cutting-edge pull-out storage solutions, and a total overhaul of the lighting scheme, you can effectively double the usability of your space without ever moving a wall. Utilizing counter-depth appliances and highly reflective materials will further trick the eye, establishing an expansive and welcoming atmosphere. Ultimately, a well-executed small kitchen remodel not only drastically increases the resale value of your property, but it also fundamentally improves your daily quality of life.
Your kitchen should be a place of joy, connection, and culinary creativity, not a source of frustration. With careful planning, an understanding of the space-saving tactics outlined in this guide, and the help of experienced local professionals, you can breathe vibrant new life into your older Renton home, creating a beautiful kitchen that will serve your family perfectly for decades to come.